Tutorials: Photoshop
Simple steps to adjust images in Photoshop
This tutorial is based around Photoshop CS2, but the basics can be utilized with other software programs assuming they have similar options.
Now to the goodies. You have a great picture yet the color is not quite right. You remember it being more vivid yet it has turned out somewhat washed out. What to do?
For this tutorial, I will be using an image I took while on vacation with my Canon PowerShot S500. The image itself, in comparison to my recollection, is washed out and lacking the brightness of color and detail that I remember. So, utilizing Photoshop CS2, I will perform some simple steps to bring out the color and detail.
For giggles, the first task would see if PhotoShops "auto adjust" will do a good enough job for you. Select Image / Adjustments / Auto Level (or Shift + CTRL + L) and see what Photoshop does to the image. If it resolves your problem or makes it "good enough" then you are done. If not, undo the change by selecting Edit / Undo Auto Levels )or CTRL + Z). With my picture, Auto Levels resulted in: Auto Adjusted Image.
Since Auto Adjust did not work for me, I am going to step through a couple additional tools.
Step 1: Exposure Settings
* With the image open, select Image / Adjustments / Exposure. This will open up an exposure dialog box with the options: Exposure, Offset and Gamma.
- Exposure: Can adjust picture brightness and shadows but not highlights
- Offset: Darkens the image range including shadows
- Gamma: Primarily adjusts mid-tone brightness
Start by adjusting the Exposure option. In my case, I slightly lowered exposure to darken the image. I followed up with slight adjustments to Offset and Gamma. Don't be afraid to play around with the settings as you can always null them back to "0".
Step 2: Shadow/Highlight
* Select Image / Adjustments / "Shadow/Highlight". This will open up an another dialog box with the options: Shadows and Highlights. These options are pretty self explanetory in their function. For this picture adjustment, I simply increased the Shadow to 14%.
Here is a comparison of the original picture against the two steps above. The exposure adjustment increased the detail in the shadow areas. Adjusting the shadow lightened the shadowed sections within the image. The end result is a more detailed picture than the original. Click to view comparison
Step 3: Adjust Saturation
* Select Image / Adjustments / "Hue/Saturation". This will open up an another dialog box with the options: Hue, Saturation and Lightness.
- Hue: Can adjust picture colors across the scale
- Saturation: Increases the color depth
- Lightness: Brightens or darkens the image
Since the image color was good, there was no Hue change needed. Since I wanted to highlight the image colors, I chose to increase the saturation level. In this case, I increased the images Saturation by +21. Usually, that is high, but I wanted to bring out the sky, red rock and the tree color (again, I'm adjusting this to my tastes).
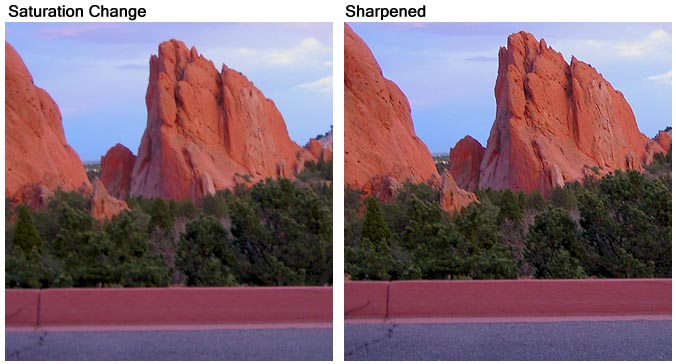
Step 4: Sharpen the image
* As the final step, I sharpened the image to further bring out detail. This can be done by selecting Filter / Sharpen / Sharpen
This picture shows the outcome from steps 3 and 4:
This tutorial is based around Photoshop CS2, but the basics can be utilized with other software programs assuming they have similar options.
Now to the goodies. You have a great picture yet the color is not quite right. You remember it being more vivid yet it has turned out somewhat washed out. What to do?
For this tutorial, I will be using an image I took while on vacation with my Canon PowerShot S500. The image itself, in comparison to my recollection, is washed out and lacking the brightness of color and detail that I remember. So, utilizing Photoshop CS2, I will perform some simple steps to bring out the color and detail.
;) |
The image to the left is the picture needing adjustment. I have already resized the image to 800x600 to make it more viable for this tutorial. When performing these tasks you must realize that picture color is pretty much subjective. What one would call flat or washed out, another would say it is "natural". Regardless, this tutorial is to simply show some easy ways to adjust images and you happen to be stuck with my taste of what the final image should look like. Oh Boy! |
For giggles, the first task would see if PhotoShops "auto adjust" will do a good enough job for you. Select Image / Adjustments / Auto Level (or Shift + CTRL + L) and see what Photoshop does to the image. If it resolves your problem or makes it "good enough" then you are done. If not, undo the change by selecting Edit / Undo Auto Levels )or CTRL + Z). With my picture, Auto Levels resulted in: Auto Adjusted Image.
;)
Since Auto Adjust did not work for me, I am going to step through a couple additional tools.
Step 1: Exposure Settings
* With the image open, select Image / Adjustments / Exposure. This will open up an exposure dialog box with the options: Exposure, Offset and Gamma.
;)
- Exposure: Can adjust picture brightness and shadows but not highlights
- Offset: Darkens the image range including shadows
- Gamma: Primarily adjusts mid-tone brightness
Start by adjusting the Exposure option. In my case, I slightly lowered exposure to darken the image. I followed up with slight adjustments to Offset and Gamma. Don't be afraid to play around with the settings as you can always null them back to "0".
Step 2: Shadow/Highlight
* Select Image / Adjustments / "Shadow/Highlight". This will open up an another dialog box with the options: Shadows and Highlights. These options are pretty self explanetory in their function. For this picture adjustment, I simply increased the Shadow to 14%.
;)
Here is a comparison of the original picture against the two steps above. The exposure adjustment increased the detail in the shadow areas. Adjusting the shadow lightened the shadowed sections within the image. The end result is a more detailed picture than the original. Click to view comparison
;)
Step 3: Adjust Saturation
* Select Image / Adjustments / "Hue/Saturation". This will open up an another dialog box with the options: Hue, Saturation and Lightness.
;)
- Hue: Can adjust picture colors across the scale
- Saturation: Increases the color depth
- Lightness: Brightens or darkens the image
Since the image color was good, there was no Hue change needed. Since I wanted to highlight the image colors, I chose to increase the saturation level. In this case, I increased the images Saturation by +21. Usually, that is high, but I wanted to bring out the sky, red rock and the tree color (again, I'm adjusting this to my tastes).
Step 4: Sharpen the image
* As the final step, I sharpened the image to further bring out detail. This can be done by selecting Filter / Sharpen / Sharpen
This picture shows the outcome from steps 3 and 4:
;) |
The end result is a photo that has more of the true colors that I remember. The sky is more detailed, the rock colors are vibrant and the surrounding greenery is more crisp. While the overall change is not that drastic, that was never the intent. Realize this picture was taken during dusk so the intent of this tutorial was simply to make it more accurate and not make it into a "daytime" picture. We hope this Photo tutorial has been helpful. |