Tutorials: Photoshop
Using Photoshop Quick Mask
Car freaks like to play around with Photoshop to make changes to their cars, be it colors or even lowering and other modifications. This tutorial is based around Photoshop CS2 (or higher) and will guide you through one way to change the color of a car photo.
The actual process is relatively easy and this particular conversion took very little time to perform. Of course, digital images will differ and some will be more difficult than others to crop out the unnecessary image sections. Patience is key.
For this tutorial I am starting with a picture of the Nissan Sport Concept as seen below:
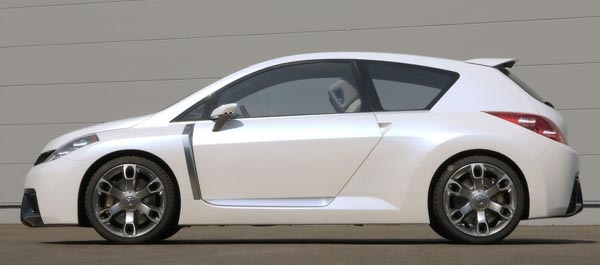
Original Image
--- Open the digital image in Photoshop. Once the image has been opened, press Q to initiate Quick-Mask mode. You can tell Quick-Mask mode has been enabled by looking at the title bar of the image as it should now show:

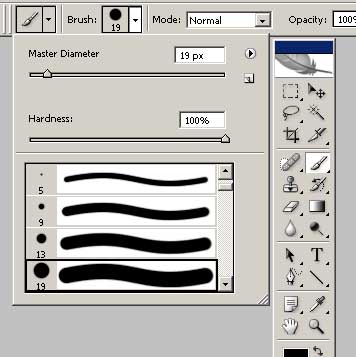
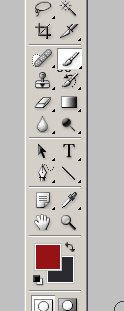
--- From the tool bar, select the paint brush icon. This will open the paint-bar. Select a starting brush size to use for the mask effect. During the course of the mask selection process, you will probably need different sizes of brushes in order to highlight all aspects of the photo.
--- Start using the paintbrush to select the portions of the image that you do not with to utilize. The selections will turn red as you go over them with the paintbrush
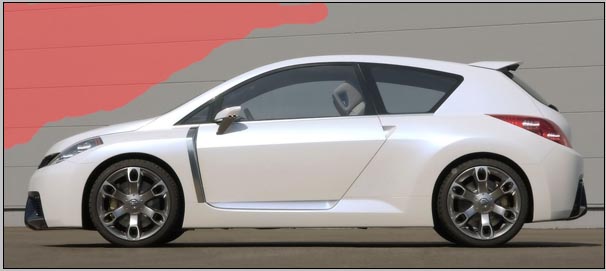
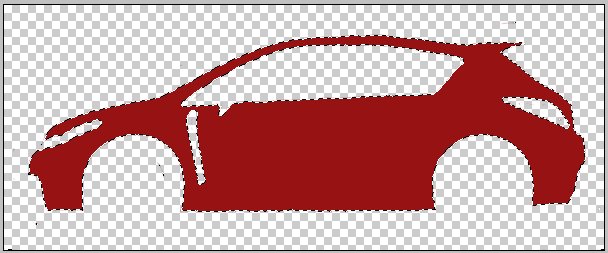
--- Continue utilizing the paintbrush, with varying sizes, until the sections you wish to exclude from the image are completely covered. As you can see I have covered all aspects of the image that are not part of the body.

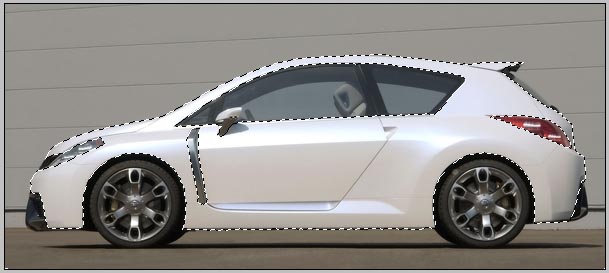
--- When complete, press Q again to exit Quick-Mask mode. At this point, the non-selected portions of the photo will be outlined by the Photoshop "ants"
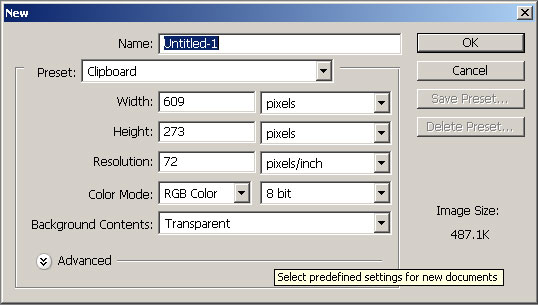
--- At this point, select Edit/Copy from the top bar to copy the selected image, then select File/New to create a new image. Make sure you select "Transparent" for Background Contents" and click "OK" to create a blank canvas.
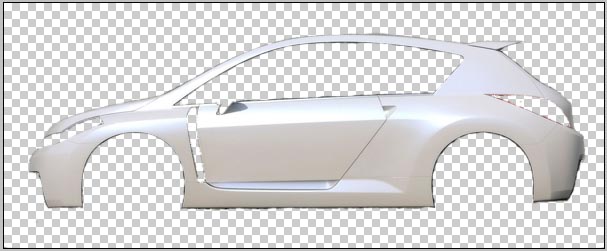
--- With the new, blank canvas in place, press CTRL+V or File/Paste to paste the copied outline into the new image.
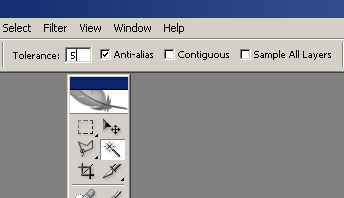
--- Select the Magic Wand tool. On the top bar, Change Tolerance to a small level and make sure Contiguous is not selected
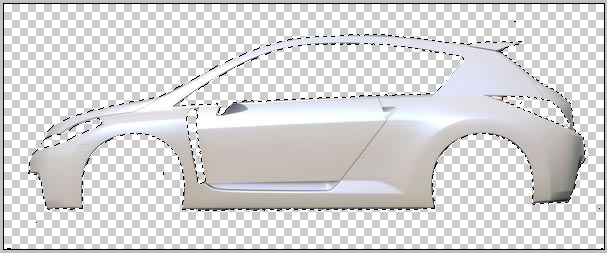
--- With the Magic Wand selected, click once on the empty portion of the new image to select the blank space. From the top bar, press Select and Inverse. At this point, the cutout mask you pasted into the image will be highlighted
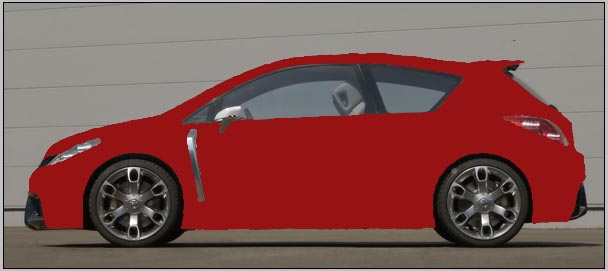
--- Now it is time to color the car. There are a couple of different ways to perform this task and the steps below are one of the ways to do it. Dependant on the color of the picture, you could select Image/Adjustments/Color Balance from the top bar and along with Hue and Saturation, you can try to get the color you are looking for. If successful, you can skip the rest of this step. In this step, we are going to force a color change by making the selected section a set color. In this case, red. From the tool bar, select the paing brush and make the main color red. Select a large-sized paint brush size and proceed to paint the selected section red (or your color of choice).
--- From the top bar, select Edit/Copy, open the original image you were working with and select Edit/Paste. You may need to move the image around to get it in the right location
--- If you did not perform the color portion of the step above, and are happy with the picture, then you are done. If you colored the image then you have a red overlay and will proceed with the next steps. Pasting the colored cutout into the original image gave you a new layer as can be seen via the Layers box (Press F7 if you do not see this tool box). Double click the new layer to launch the Layer Style options box
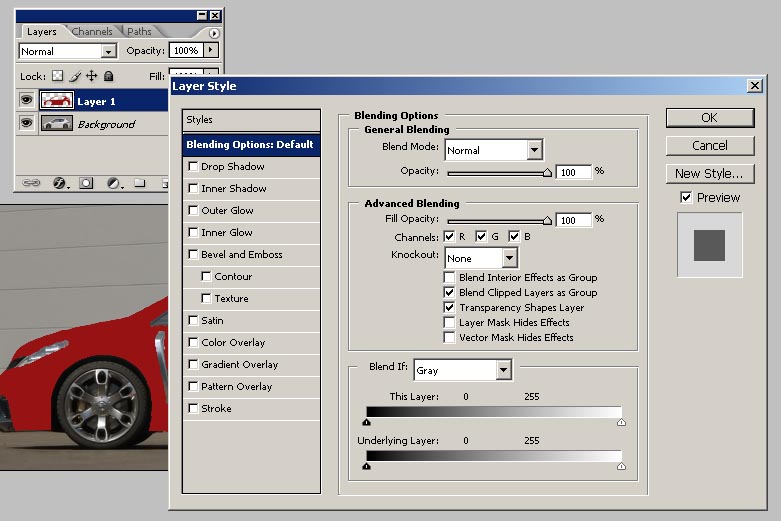
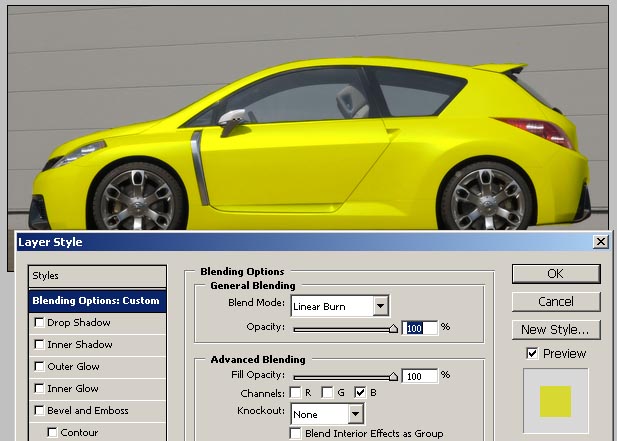
--- In the Layer Style box, select the Blend Mode drop down box. I used Linear Burn on the image and deselected the Red and Green channels in the Advanced Blending section to make the car yellow as seen below.
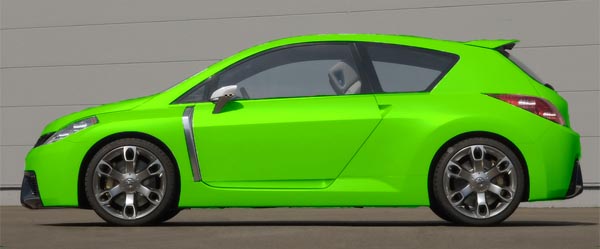
The final result is up to you. You can add additional layers of color onto the car with different Blend Mode options if so desired as seen below:
We hope this Photo tutorial has been helpful. If you have any questions, please let us know.
Car freaks like to play around with Photoshop to make changes to their cars, be it colors or even lowering and other modifications. This tutorial is based around Photoshop CS2 (or higher) and will guide you through one way to change the color of a car photo.
The actual process is relatively easy and this particular conversion took very little time to perform. Of course, digital images will differ and some will be more difficult than others to crop out the unnecessary image sections. Patience is key.
For this tutorial I am starting with a picture of the Nissan Sport Concept as seen below:
Original Image
--- Open the digital image in Photoshop. Once the image has been opened, press Q to initiate Quick-Mask mode. You can tell Quick-Mask mode has been enabled by looking at the title bar of the image as it should now show:
--- From the tool bar, select the paint brush icon. This will open the paint-bar. Select a starting brush size to use for the mask effect. During the course of the mask selection process, you will probably need different sizes of brushes in order to highlight all aspects of the photo.
--- Start using the paintbrush to select the portions of the image that you do not with to utilize. The selections will turn red as you go over them with the paintbrush
--- Continue utilizing the paintbrush, with varying sizes, until the sections you wish to exclude from the image are completely covered. As you can see I have covered all aspects of the image that are not part of the body.
--- When complete, press Q again to exit Quick-Mask mode. At this point, the non-selected portions of the photo will be outlined by the Photoshop "ants"
--- At this point, select Edit/Copy from the top bar to copy the selected image, then select File/New to create a new image. Make sure you select "Transparent" for Background Contents" and click "OK" to create a blank canvas.
--- With the new, blank canvas in place, press CTRL+V or File/Paste to paste the copied outline into the new image.
--- Select the Magic Wand tool. On the top bar, Change Tolerance to a small level and make sure Contiguous is not selected
--- With the Magic Wand selected, click once on the empty portion of the new image to select the blank space. From the top bar, press Select and Inverse. At this point, the cutout mask you pasted into the image will be highlighted
--- Now it is time to color the car. There are a couple of different ways to perform this task and the steps below are one of the ways to do it. Dependant on the color of the picture, you could select Image/Adjustments/Color Balance from the top bar and along with Hue and Saturation, you can try to get the color you are looking for. If successful, you can skip the rest of this step. In this step, we are going to force a color change by making the selected section a set color. In this case, red. From the tool bar, select the paing brush and make the main color red. Select a large-sized paint brush size and proceed to paint the selected section red (or your color of choice).
--- From the top bar, select Edit/Copy, open the original image you were working with and select Edit/Paste. You may need to move the image around to get it in the right location
--- If you did not perform the color portion of the step above, and are happy with the picture, then you are done. If you colored the image then you have a red overlay and will proceed with the next steps. Pasting the colored cutout into the original image gave you a new layer as can be seen via the Layers box (Press F7 if you do not see this tool box). Double click the new layer to launch the Layer Style options box
--- In the Layer Style box, select the Blend Mode drop down box. I used Linear Burn on the image and deselected the Red and Green channels in the Advanced Blending section to make the car yellow as seen below.
The final result is up to you. You can add additional layers of color onto the car with different Blend Mode options if so desired as seen below:
We hope this Photo tutorial has been helpful. If you have any questions, please let us know.