Tutorials: WorkFlow
Workflow 1: Converting RAW images
RAW is a format that some digital cameras can use to save images in as opposed to JPEG. If your camera doesn't support RAW, this tutorial will not help (Future tutorials will be available soon).
RAW has several advantages over JPEG. One, it uses lossless compression. Two, it has a higher color depth (more on this in a future tutorial). Three, it gives you some control over exposure and total control over "white balance" (addressed later in the tutorial) even after the shot.
For this portion we will be using Adobe Bridge and Adobe Camera RAW. Both come included with Photoshop CS and CS 2. Some alternatives to these programs include BreezeBrowser and Capture One.
Adobe Bridge is a progam used for "Asset Management". Asset Management is basically just a term for being able to organize and find your files. While it's especially important for professionals, keeping files organized is important for amateurs as well.
In the rest of the tutorial click on any of the images to see them full-size.
If your camera supports RAW, enable it and take a few shots. Or if you already shoot in RAW, you're ready to go!
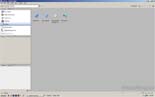
Open Adobe Bridge. When you open Bridge you'll see a screen about like this:
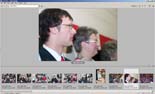
I much prefer the Filmstrip Focus mode - this changes the way Bridge looks and functions. I find it makes it much easier to find files and preview them full-size before I open in them in Adobe RAW or Photoshop. To access Filmstrip Focus mode, either click the Window menu, Workspace, Filmstrip Focus, or keystroke Ctrl+F5.
Now that we're setup we can get to work. Double-click on a RAW camera file you've copied over from your camera. In my case, since most of my photos are shot on Canons, they end in the .crw extension. Your's may be different.
Double-click on any of the files to open it up in Camera RAW. This will move you over to Photoshop.
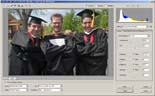
Now we have a happy picture of a few college graduates and one of their favorite profs. It's really a pretty decent shot already, partly because Adobe RAW has already done some work to it without us even telling it to.
You'll notice there are quite a few areas to the Adobe RAW interface, but we're only going to bother ourselves with a few of them for now.
The Adjustments pane is where you'll do most of your work in RAW. We'll start with the Histogram at the top.
to try to detect what the color "white" is in an image.
Sometimes, they do a good job of it, especially in easy siutations such as outdoors in brightly lit sunlight, like this image. Others, such as a room
with mixed types of lighting, might "fool" the camera, and you'll end up with an image that has a colored tint to it that's undesirable. You have two
options here - you can either select one of the "presets" from the dropdown menu, or you can manually
tweak the "Temperature" and "Tint" of the image.
The presets include settings such as Sunlight, Cloundy, Flourescent, and others. Sometimes even if an image looks fairly "accurate", selecting a
different white balance setting will help to "warm" the image, give it a richer color. Alternatively, try messing with the manual Temperature and
Tint settings - you might happen upon a look you like.
Next we have several settings that all seem to affect the same thing - the "brightness" of the image. However, there are subtle differences that can be useful for saving some images from the useless bin. Read on if you like, otherwise, you can just settle for the Auto settings.
Exposure sets the white point of your image. While it affects the overall brithness of your entire image, it is meant to affect the highlights (bright parts) of your image primarily. You can use the Exposure tool to try to bring back detail in highlights that are blown out (over-exposed). If you drag it to the right, it will raise the level of the highlights. If you drag it to the left, it will lower that level.
Shadows is the opposite of Exposure - it's meant to affect the shadows (dark parts) of your image, also known as the black point. If there are areas that are too dark and you can't see details you think should be there, do the same as with the Exposure slider - slide it to the right to bring the levels up, slide it to the left to bring them down (lowering the shadow level is commonly referred to as "crushing the blacks" or "crushing the shadows"). One of the most important parts of an image is good contrast - nice deep blacks, and rich highlights. The Exposure and Shadows sliders are very helpful in that.
Brightness affects the midrange of your image - also known as the grey point. Afer you have set your white point and black point with the Exposure and Shadows sliders, you can use the Brightness slider to adjust the brightness of the overall image.
Contrast and Saturation are best ignored for now - you can control the same things in Photoshop, with greater control.
RAW is a format that some digital cameras can use to save images in as opposed to JPEG. If your camera doesn't support RAW, this tutorial will not help (Future tutorials will be available soon).
RAW has several advantages over JPEG. One, it uses lossless compression. Two, it has a higher color depth (more on this in a future tutorial). Three, it gives you some control over exposure and total control over "white balance" (addressed later in the tutorial) even after the shot.
For this portion we will be using Adobe Bridge and Adobe Camera RAW. Both come included with Photoshop CS and CS 2. Some alternatives to these programs include BreezeBrowser and Capture One.
Adobe Bridge is a progam used for "Asset Management". Asset Management is basically just a term for being able to organize and find your files. While it's especially important for professionals, keeping files organized is important for amateurs as well.
In the rest of the tutorial click on any of the images to see them full-size.
If your camera supports RAW, enable it and take a few shots. Or if you already shoot in RAW, you're ready to go!
Open Adobe Bridge. When you open Bridge you'll see a screen about like this:
;)
I much prefer the Filmstrip Focus mode - this changes the way Bridge looks and functions. I find it makes it much easier to find files and preview them full-size before I open in them in Adobe RAW or Photoshop. To access Filmstrip Focus mode, either click the Window menu, Workspace, Filmstrip Focus, or keystroke Ctrl+F5.
;)
Now that we're setup we can get to work. Double-click on a RAW camera file you've copied over from your camera. In my case, since most of my photos are shot on Canons, they end in the .crw extension. Your's may be different.
;)
Now we have a happy picture of a few college graduates and one of their favorite profs. It's really a pretty decent shot already, partly because Adobe RAW has already done some work to it without us even telling it to.
You'll notice there are quite a few areas to the Adobe RAW interface, but we're only going to bother ourselves with a few of them for now.
The Adjustments pane is where you'll do most of your work in RAW. We'll start with the Histogram at the top.
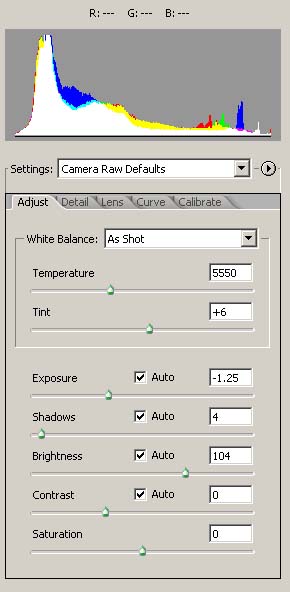 |
The Histogram is a visual representation of the data that composes your image. The first thing to learn is that the left side represents darkness, and the right side, brightness. So an image that has quite a bit of "stuff" on the left side means it's an image with quite a bit of darkness, and one with most of the "stuff" on the right side means it's a pretty "bright" image. This one is pretty well-balanced - we can see that there's a pretty decent amount of "dark" in it, mostly coming from the black robes of our subjects. The
Histogram is useful for telling you at a glance if there's a problem with the image - if you see a big spike over on the right side, you know that there might be a highlight "clipping" (where part of the image is so bright the camera was overwhelmed, and there's no detail there anymore). Alternatively,
if it looks "scrunched" all the way to the left, there might not be enough light in the scene. Keep this in mind the next time you're shooting - once you get used to looking at one, it can help you a lot when you're reviewing an image.
Next we have the actual adjustments. This is where the real power of RAW comes into play. White Balance is the first adjustment we have in the list. Digital cameras have |
Next we have several settings that all seem to affect the same thing - the "brightness" of the image. However, there are subtle differences that can be useful for saving some images from the useless bin. Read on if you like, otherwise, you can just settle for the Auto settings.
Exposure sets the white point of your image. While it affects the overall brithness of your entire image, it is meant to affect the highlights (bright parts) of your image primarily. You can use the Exposure tool to try to bring back detail in highlights that are blown out (over-exposed). If you drag it to the right, it will raise the level of the highlights. If you drag it to the left, it will lower that level.
Shadows is the opposite of Exposure - it's meant to affect the shadows (dark parts) of your image, also known as the black point. If there are areas that are too dark and you can't see details you think should be there, do the same as with the Exposure slider - slide it to the right to bring the levels up, slide it to the left to bring them down (lowering the shadow level is commonly referred to as "crushing the blacks" or "crushing the shadows"). One of the most important parts of an image is good contrast - nice deep blacks, and rich highlights. The Exposure and Shadows sliders are very helpful in that.
Brightness affects the midrange of your image - also known as the grey point. Afer you have set your white point and black point with the Exposure and Shadows sliders, you can use the Brightness slider to adjust the brightness of the overall image.
Contrast and Saturation are best ignored for now - you can control the same things in Photoshop, with greater control.